KB Article #2229
Once your eBay business account is set up, you will need to create a Parts Center profile to display information about your dealership at the bottom of your part listings. Note: Updates made to the Parts Center Profile will occur on the predetermined Refresh Date that displays in your Manage Profile page.
To create your Parts Center profile:
- Visit the eBay Parts Center page at https://partscenter.ebay.com/.
- Sign into the Parts Center using your eBay business user ID and Password.
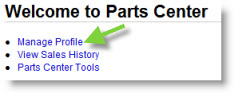
- Click on Manage Profile.
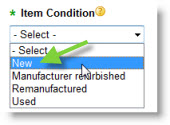
- From the Item Condition drop-down, select New. (Only new parts can be listed in the MarketplaceDirect program.)
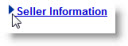
- Click the Seller Information link to open.
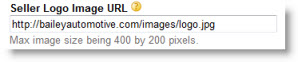
- Type the web location for the logo you wish to add to your eBay Parts Center Profile in the Seller Logo Image URL field. The Parts Center Profile will be shown at the bottom of each of your parts listings. Note: The maximum image size is 400 by 200 pixels.
- Use the About the Seller box to add information about your dealership and parts center. Include a friendly message to customers that will entice them to buy!

- If desired, add three additional images to your profile using the About the Seller Image URLs box. Type the additional image URLs in the field provided, using commas to separate. The maximum image size is 300 by 200 pixels.

- List the days and times for your availability to customers in the Hours of Operation box. Be sure to include the time zone that you are located in.

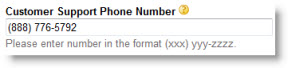
- Type the number that you want customers use for customer service in the Customer Support Phone Number.
- Click the No option for the Make My Inventory Images Primary box.

- Click the Item Location link to open.

- Verify the Country drop-down lists United States.

- Type your ZIP Code in the field provided.
-or-
Type your City and State in the field provided.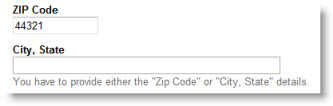
- Click the Shipping & Handling link to open.

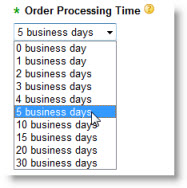
- Select your Order Processing Time from the drop-down. This is the time it takes you to prepare an item for shipping after you have sold it to a customer. This does not include the shipping time. To maintain Top Rated Seller status you will have to ship your parts out within this selected time frame.
- The Global Shipping Program allows users to send shipments internationally without incurring the international shipping charges. Using this method, when a part sells internationally the dealer will ship the order to eBay's processing facility in Kentucky. All shipping costs beyond that point will be the responsibility of the international buyer. (Click here for more information.) Click Yes.

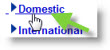
- Click the Domestic link to open.
- Use the Shipping Services (Flat) drop-down list to select the best shipping option for your parts department. OEC recommends that you select the Standard Flat Rate Shipping Service (1 to 5 business days) option--located under Standard Services.

- To ensure your parts consistently display higher in buyer search results, make sure the Free Shipping box is checked. Note: The shipping charges you apply within MarketplaceDirect will override this option. (Click here for more information.) Unchecking this box will only apply shipping charges to parts added directly within eBay.

- Click the International link to open.

- Select the International Shipping Not Accepted option from the International Shipping drop-down list. (If you would like to ship internationally, use the Global Shipping Program--discussed in Step 17--to ensure international shipping charges are paid by the buyer. Dealers that accept international shipping on this step will be responsible for all shipping costs.)

- Click the Exclude Options link to open.

- If you want to exclude certain shipping destinations (such as Alaska and Hawaii), select the appropriate option.
- Click the Returns link to open.

- Click the Returns Policy and select if you accept returns or do not accept returns. Note: It is recommended that you select the Returns Accepted option to provide outstanding customer service.

- Use the Item must be returned within drop-down to select the timeframe buyers have to return parts. (30 or 60 days)

- Select your refund preference from the Refund will be given as drop-down. You can choose to only provide money back or allow the buyer to choose between receiving money back or exchanging the part.

- Use the Restocking Fee drop-down to ensure you are not applying a charge for returned parts.

- Use the Return shipping paid by option to select who is responsible for the shipping costs on a return part. Select Seller to have your dealership cover the return shipping cost. Select Buyer to have the buyer of the part cover the return shipping cost.

- Click the Core Charges link to open.
- To display the core charge for parts, check the Show core charges in the listings box. This option ensures listings include a statement that the sales price includes a core of $X (the core charge is listed).

-or-
If you do not want to show core charges, uncheck the box for Show core charges in the listings. If you don't check the box, the price will still include both the discounted price and the core price, but the buyer will not be notified there is a core charge.
- Select your Core Return Policy from the drop-down. (Core Returns Accepted or Core Returns Not Accepted)

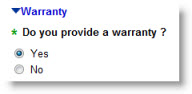
- Click the Warranty link to open.

- If you provide a warranty for parts, click the Yes option under Do you provide a warranty?
- If providing a warranty, use the What is the duration of the warranty drop-down to select the length of time offered.

- Select the Warranty Type from the drop-down list.

- Click Save to save your changes.